What Is Code Hack
Code Hack is a term I coined in an attempt to programmatically express little ideas that make life a little more convenient. The following is a list of code hack ideas. Make full use of them!
The Sound Wave Graph
Programming language used
Occasionally needed code hack that can easily draw audio waveforms.
Install Packages
        pip install matplotlib
        pip install librosa
Python Code
        import librosa
        import librosa.display
        import matplotlib.pyplot as plt

        a, sr = librosa.load('C:/Users/admin/Downloads/sound-wave-plot-main/sound-wave-plot-main/sample.wav')
        librosa.display.waveshow(a, sr=sr)


        #Giving a title
        plt.title("sample.wav", style = "italic", fontweight = "bold", color = "black", fontsize = 20)
        #Giving a label
        plt.xlabel("time", color = "black", fontsize = 15)
        plt.ylabel("A", color = "black", fontsize = 15)
        #Adjusting a scale width
        #plt.xlim( , )
        plt.ylim(-0.6, 0.6)
        #Giving squares
        #plt.grid()
        #Giving detail squares
        #plt.minorticks_on()

        #Displaying a Graph
        plt.show()
Result

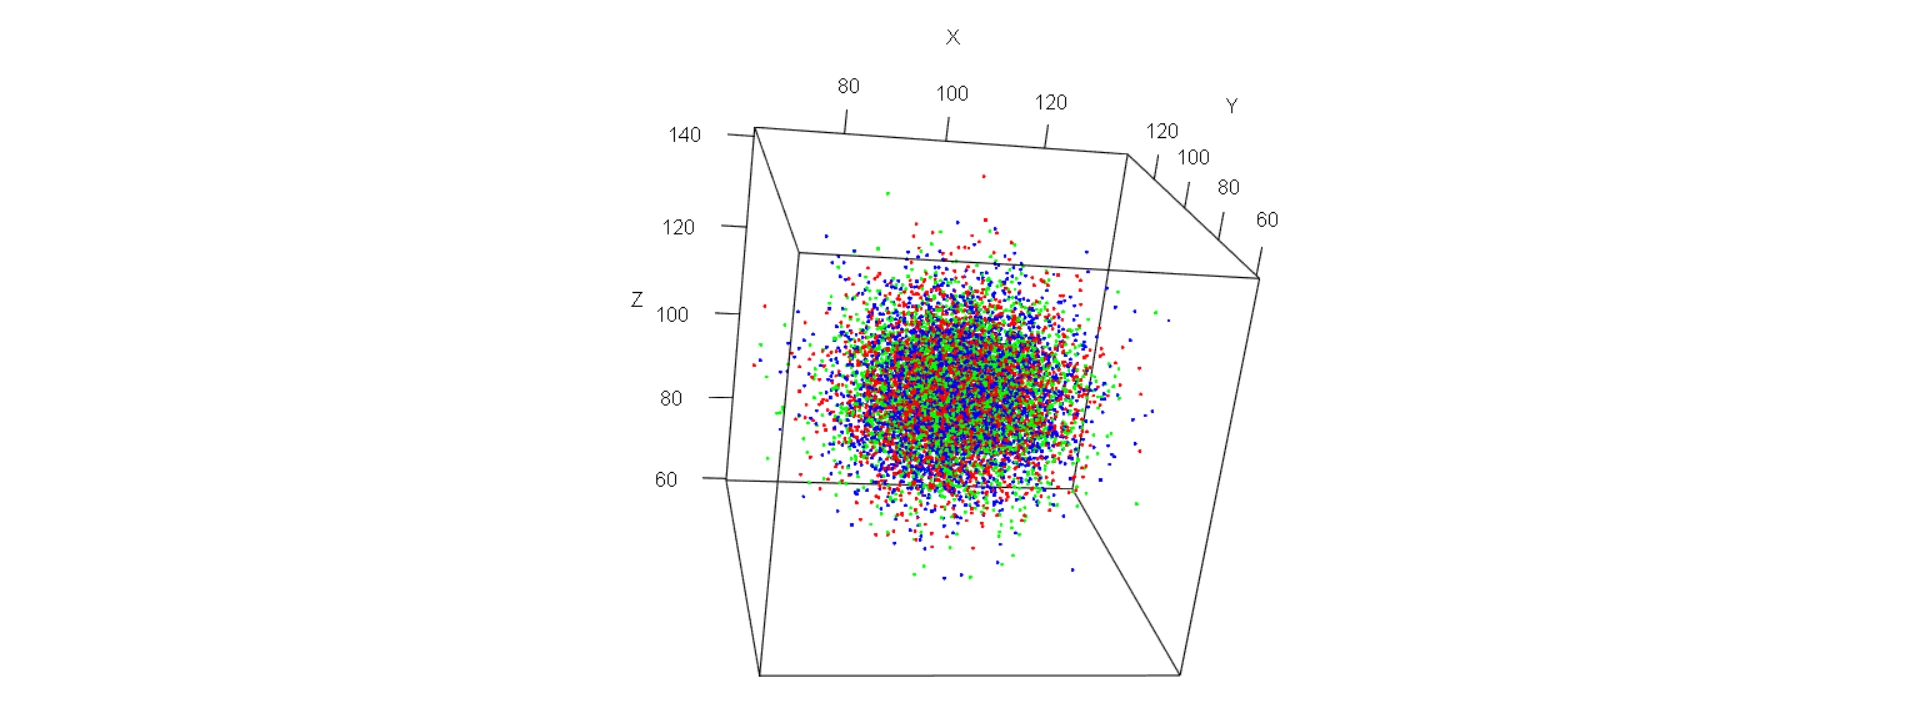
3D Scatter Diagram
Programming language used
A code hack to use when you want to write a 3-dimensional graph but wonder if it would be easy to do so.
Install Packages
      #install a package
      install.packages("rgl")
      library("rgl")

      # rnorm(number, average, variance)
      a <-rnorm(10000, 100, 10)
      b <-rnorm(10000, 100, 10)
      c <-rnorm(10000, 100, 10)

      df <-data.frame("a"=a, "b"=b, "c"=c)

      #This is a type h plot.
      plot3d(df[c("a", "b", "c")], type="h", xlab="X", ylab="Y", zlab="Z", col = rainbow(3))
      #This is a type p plot.
      plot3d(df[c("a", "b", "c")], type="p", xlab="X", ylab="Y", zlab="Z", col = rainbow(3))
Result (Type h)

Result (Type p)
Power Point Slider
Programming language used
Occasionally needed code hack that can easily draw audio waveforms.
HTML
<!DOCTYPE html>
<html lang="en">
  <head>
    <meta charset="UTF-8" />
    <meta name="viewport" content="width=device-width, initial-scale=1.0" />
    <title>PowerPoint Slider</title>
    <link rel="stylesheet" href="https://unpkg.com/swiper/swiper-bundle.min.css" />
    <link rel="stylesheet" href="./style.css" />
  </head>
  <body>
    <div class="swiper-container vertical-slider">
      <div class="swiper-wrapper vertical-slider__wrapper">
          <!--Insert slide additional parts below this.-->
          <!--PNG to Slide 15.PNG are inserted in advance.-->

        <div class="swiper-slide vertical-slider__slide">
            <img class="slide" src="img/スライド1.PNG">
        </div>
        <div class="swiper-slide vertical-slider__slide">
            <img class="slide" src="img/スライド2.PNG">
        </div>
        <div class="swiper-slide vertical-slider__slide">
            <img class="slide" src="img/スライド3.PNG">
        </div>
        <div class="swiper-slide vertical-slider__slide">
            <img class="slide" src="img/スライド4.PNG">
        </div>
        <div class="swiper-slide vertical-slider__slide">
            <img class="slide" src="img/スライド5.PNG">
        </div>
        <div class="swiper-slide vertical-slider__slide">
            <img class="slide" src="img/スライド6.PNG">
        </div>
        <div class="swiper-slide vertical-slider__slide">
            <img class="slide" src="img/スライド7.PNG">
        </div>
        <div class="swiper-slide vertical-slider__slide">
            <img class="slide" src="img/スライド8.PNG">
        </div>
        <div class="swiper-slide vertical-slider__slide">
            <img class="slide" src="img/スライド9.PNG">
      </div>
      <div class="swiper-slide vertical-slider__slide">
        <img class="slide" src="img/スライド10.PNG">
      </div>
      <div class="swiper-slide vertical-slider__slide">
        <img class="slide" src="img/スライド11.PNG">
      </div>
      <div class="swiper-slide vertical-slider__slide">
        <img class="slide" src="img/スライド12.PNG">
      </div>
      <div class="swiper-slide vertical-slider__slide">
        <img class="slide" src="img/スライド13.PNG">
      </div>
      <div class="swiper-slide vertical-slider__slide">
        <img class="slide" src="img/スライド14.PNG">
      </div>
      <div class="swiper-slide vertical-slider__slide">
        <img class="slide" src="img/スライド15.PNG">
      </div>


      <!--Insert additional slide parts above this.-->
      <div class="swiper-pagination vertical-slider__pagination"></div>
    </div>
    <script src="https://unpkg.com/swiper/swiper-bundle.min.js"></script>
    <script src="script.js"></script>
  </body>
</html>
CSS
    .container {
      scrollbar-width: none;
      -ms-overflow-style: none;
    }
    .container::-webkit-scrollbar {
    display: none;
    }
    * {
      margin: 0;
      padding: 0;
      box-sizing: border-box;
    }
    .vertical-slider {
      width: 100%;
      height: 100vh;
      height: calc(var(--vh, 1vh) * 100);
    }
    .vertical-slider__slide {
      height: 100%;
      width: 100%;
      display: flex;
      justify-content: center;
      align-items: center;
      font-size: 10rem;
      font-family: "Open Sans", sans-serif;
      font-weight: bold;
      color: #fff;
    }
    .vertical-slider__slide:nth-child(6n) {
      background-color: #fa5457;
    }
    .vertical-slider__slide:nth-child(6n+1) {
      background-color: #fa8925;
    }
    .vertical-slider__slide:nth-child(6n+2) {
      background-color: #f6d51f;
    }
    .vertical-slider__slide:nth-child(6n+3) {
      background-color: #01b4bc;
    }
    .vertical-slider__slide:nth-child(6n+4) {
      background-color: #5fa55a;
    }
    .vertical-slider__slide:nth-child(6n+5) {
        background-color: pink;
    }
    @media (max-width: 599px) {
      .vertical-slider__slide {
        font-size: 16vw;
      }
    }
    @media screen and (max-width: 1349px) {
      .slide {
        width: 100vw;
        height: auto;
      }
    }
    @media screen and (min-width:1350px) and (max-width: 1500px) {
      .slide {
        width: auto;
        height: auto;
      }
    }
    @media screen and (min-width:1501px) {
      .slide {
        width: auto;
        height: 100vh;
      }
    }
JavaScript
    /*  Get height of 100vh excluding address bar/toolbar */
    function setHeight() {
      let vh = window.innerHeight * 0.01;
      document.documentElement.style.setProperty("--vh", `${vh}px`);
    }
    setHeight();
    window.addEventListener("resize", setHeight);

    /* Slider Settings */
    const verticalSlider = new Swiper(".vertical-slider", {
      direction: "vertical",
      slidesPerView: 2,
      speed: 600,
      mousewheel: true,
      SimulateTouch: true,
      grabCursor: true,
      breakpoints: {
        // when window width is <= 320px
        550: {
          slidesPerView: 1,
        }
      },
      pagination: {
        el: ".vertical-slider__pagination",
        type: "bullets",
        clickable: true,
      },
    });
Variable Division Box
Programming language used
A html snippet that can be used for other purposes than
HTML
<!DOCTYPE html>
<html lang="en">
<head>
    <meta charset="UTF-8">
    <meta http-equiv="X-UA-Compatible" content="IE=edge">
    <meta name="viewport" content="width=device-width, initial-scale=1.0">
    <link rel="stylesheet" type="text/css" href="./style.css">
    <title>Document</title>
</head>
<body>
        <ul>
            <li class="li_top">
                <div class="rotate">
                    <span>C</span>
                    <br>
                    <span>a</span>
                    <br>
                    <span>r</span>
                    <br>
                    <span>d</span>
                    <br>
                    <span>1</span>
                </div>
            </li>
            <li class="li_not_top">
                <div class="rotate">
                    <span>C</span>
                    <br>
                    <span>a</span>
                    <br>
                    <span>r</span>
                    <br>
                    <span>d</span>
                    <br>
                    <span>2</span>
                </div>
            </li>
            <li class="li_not_top">
                <div class="rotate">
                    <span>C</span>
                    <br>
                    <span>a</span>
                    <br>
                    <span>r</span>
                    <br>
                    <span>d</span>
                    <br>
                    <span>3</span>
                </div>
            </li>
            <li class="li_not_top">
                <div class="rotate">
                    <span>C</span>
                    <br>
                    <span>a</span>
                    <br>
                    <span>r</span>
                    <br>
                    <span>d</span>
                    <br>
                    <span>4</span>
                </div>
            </li>

            <li class="li_not_top">
                <div class="rotate">
                    <span>C</span>
                    <br>
                    <span>a</span>
                    <br>
                    <span>r</span>
                    <br>
                    <span>d</span>
                    <br>
                    <span>5</span>
                </div>
            </li>

            <li class="li_not_top">
                <div class="rotate">
                    <span>C</span>
                    <br>
                    <span>a</span>
                    <br>
                    <span>r</span>
                    <br>
                    <span>d</span>
                    <br>
                    <span>6</span>
                </div>
            </li>
          </ul>
</body>
</html>
CSS
      body {
        font-family: sans-serif;
        margin: 0;
        padding: 0;
      }
      ul, li {
        margin: 0;
        padding: 0;
        list-style: none;
      }
      ul {
        display: flex;
        justify-content: flex-end;
      }
      .li_top {
        flex: 99;
      }
      .li_not_top {
        flex: 1;
      }
      li {
        transition: flex 300ms ease-out, color 200ms ease-out;
        padding-left: 0px;
        padding-right: 10px;
        text-align: right;
        height: 100vh;
      }

      li:nth-child(1) {
        background: #aad5aa;
      }
      li:nth-child(1) {
        background-image: url(./amazon1.webp);
        background-repeat:  no-repeat;
        background-position:center;
        background-size: cover;
      }

      li:nth-child(2) {
        background: #8dc78d;
      }
      li:nth-child(2):hover {
        background-image: url(./amazon2.webp);
        background-repeat:  no-repeat;
        background-position: center;
        background-size: cover;
        background-color:  	#8dc78d;
      }

      li:nth-child(3) {
        background: #72b872;
      }
      li:nth-child(3):hover {
        background-image: url(./amazon3.webp);
        background-repeat:  no-repeat;
        background-position: left;
        background-size: cover;
        background-color: #72b872;
      }

      li:nth-child(4) {
        background: #55aa55;
      }
      li:nth-child(4):hover {
        background-image: url(./amazon4.webp);
        background-repeat:  no-repeat;
        background-position: left;
        background-size: cover;
        background-color: 	#55aa55;
      }

      li:nth-child(5) {
        background: #478d47;
      }
      li:nth-child(5):hover {
        background-image: url(amazon5.webp);
        background-repeat:  no-repeat;
        background-position: left;
        background-size: cover;
        background-color: #478d47;
      }

      li:nth-child(6) {
        background: #387238;
      }
      li:nth-child(6):hover {
        background-image: url(./amazon6.webp);
        background-repeat:  no-repeat;
        background-position: left;
        background-size: cover;
        background-color: #387238;
      }


      li:hover {
         flex: 3000;
         color: rgba(255, 255, 255,0);
      }
      div {
        font-size: 32px;
      }
      .rotate span {
        display: inline-block;
        transform: rotate(90deg);
        text-align: left;
        font-size: 50px;
        font-family: 'Times New Roman', serif;
      }
Easily Update Sites Distributed through GitHub Pages
Programming language used
Wouldn't it be a little more convenient if we could easily update our GitHub page? This code hack is an MS-DOS command to make it happen.
How To Use
Originally, when updating GitHub Pages, it is necessary to directly rewrite the text of the html file and enter the command to push to GitHub in the Terminal. However, this code hack can change the text in the site by simply launching a batch file, launching a text file, and writing the text in the text file. You can also update the GitHub Repository by simply typing a single word in the batch file as instructed. Such a little useful code hack.

MS-DOS & Git
      chcp 65001
      @echo off

      :A
      set input_strong =

      echo -----------------------------------------------------------------------------------------------
      echo For edit web contents, type [edit].
      echo.
      echo For web updates, type [replace].
      echo.
      echo *caution* Make sure you are connected to the Internet when launching this batch file.
      echo -----------------------------------------------------------------------------------------------

      color b0
      set /P input_strong="input:"
      echo %input_strong%

      pause

      if %input_strong%==edit (
        start sample.txt
      )
      if %input_strong%==replace (
        git add .
        git commit -m "commit"
        git push origin master
      ) else (
        goto :A
      )

      exit
HTML & JavaScript
<!DOCTYPE html>
<html lang="en">
<head>
    <meta charset="UTF-8">
    <meta http-equiv="X-UA-Compatible" content="IE=edge">
    <meta name="viewport" content="width=device-width, initial-scale=1.0">
    <link rel="stylesheet" type="text/css" href="./style.css">
    <title>Document</title>
</head>
<body>
    <div id=insertText></div>
<script>
fetch( "./sample.txt" ).then( res => res.text() ).then( text => {
document.getElementById( "insertText" ).textContent = text;
} );
</script>
</body>
</html>
CSS
      #insertText {
        white-space: pre;
        color: blue;
        font-size: 2em;
        height: 60px;
        width: 100%;
        text-align: center;
    }
Textfile
Hello, World!
Static File Delivery Using Heroku Service with Flask
Programming language used
I have created a template for delivering static files to heroku with flask.
Python
from flask import Flask,render_template
app = Flask(__name__)

@app.route("/")
def index():
    return render_template("index.html")

if __name__ == "__main__":
    app.run(debug=True)
Procfile
web: gunicorn [App name]:app
web: gunicorn [App name]:app --log-file=-
runtime.txt
python-3.10.6
requirements.txt
Flask==2.2.2
gunicorn==20.1.0
heroku CLI & Git (App Create)
heroku login
heroku create [App name]
heroku git:remote -a [App name]
git init
git add .
git commit -m "comment"
heroku git:remote -a [App name]
git push heroku main
heroku CLI & Git (App Update)
heroku git:remote -a [App name]
git add .
git commit -m "comment"
git push heroku main
Heroku CLI & Git (App Delete)
heroku git:destroy --app [App name] --confirm [App name]